Showing posts with label cupcakes. Show all posts

A Year of Pretty - January 05, 2014

Okay, okay . . . I know I've been posting a lot of cup and saucer and high tea photos this past week. But just one more tea party themed post and then I'll move on to something else.

Today's Pretty Post is from one of my FAVOURITE design inspiration sites called Design Seeds. First, I think it's a really awesome name for a design inspiration site, since each idea for design does indeed start with a seed of sorts. The seed grows and changes and grows some more until the designer arrives at the end product; the manifestation of the original design seed.

So what is Design Seeds? Basically, it's a palette search tool based around colours found in an item, such as shown in today's post. Think of it as an elegant version of paint chips you'd find at Home Depot or Rona.

Created by Jessica in 2009, Design Seeds began as a way for her to incorporate her love of colour with design blogging. Throughout her art school training at the Center for Creative Studies and her extensive design career working with companies such as Ford, Reebok and Timberland, Jessica has created original colour journals. Design Seeds is a modern interpretation of these journals.

While the colour palettes shown do not have any specific paint brands associated with them, there are many paint stores that will scan a colour swatch and create a corresponding paint colour. Just keep in mind that what you see on your screen and what is printed from your desktop printer may be slightly different.

Design away my friends .  .Design away !

Rum Balls for Valentine's Day

My mom loves rum balls. So the other day I thought I would pick some up from the local bakery as a Valentine’s gift for her. Oh My Word…..EXPENSIVE ! Yes, I know they are hand made in house. But at $3.50 each, I decided to pass.

Two nights later I decided to bake a chocolate cake. It was beautiful, it was moist. It was in a ring form pan. I turned the pan upside down too early, and the cake split in the center. Half stayed in the pan, the other half was on the cooling rack. Rather than despair, my immediate thought was “hey…I know, I’ll make rum balls.” So I left the cake to finish cooling completely, then put both halves on a plate, wrapped it and put it in the refrigerator.
The next day I took the cake out and let it come to room temperature. Then I crumbled the cake into a bowl and added dark rum. Don’t know how much; just kept adding rum a little at a time until the cake began to hold together when pressed into balls. Then I rolled the moistened crumb mixture into bite sized balls and set them aside.

Next I got out a couple shallow bowls and put my decorating finishes in each. One for powdered sugar mixed with cocoa powder, another for the traditional chocolate sprinkles, another for pastel and one more for rainbow sprinkles.
I discovered there is a trick to making the different coatings stick. For the powdered mixture, I could just roll the ball in the bowl to coat them, and then place them in the mini paper cups. But for the sprinkles I had to find a way to make them stick. I found the best way was to lightly brush the outside of each ball with a bit of the rum, and then roll it around in the bowl with the sprinkles. A bit tedious, but it got the job done.

I have a few candy and chocolate boxes I’ve saved. I find they are perfect for when giving a treat gift; you don’t have to worry about getting your container back and the packaging can be recycled by the recipient. So after placing each rum ball in a mini paper cup, I arranged them in a gold Godiva chocolate box. Tied the box with a pretty red bow and stored it in the refrigerator until the next day.
When mom got the box, she was confused, because a box of chocolates is not something I would normally give her. So when she opened it, she was delightfully surprised.

And for the next couple days I had to smile whenever I heard her say to a guest “Want a rum ball? My daughter made them for me”. It’s nice to have a gift appreciated, but even nicer to know it’s so well received that the recipient wants to share it with others.

And that’s the spirit of giving.

Happy Valentine’s Day

I'll Take the Cake

Looking for a beautiful way to show of your baking? Have a gander at these gorgeous cake and treat stands by vesselsandwares, sure to make your guests drool.

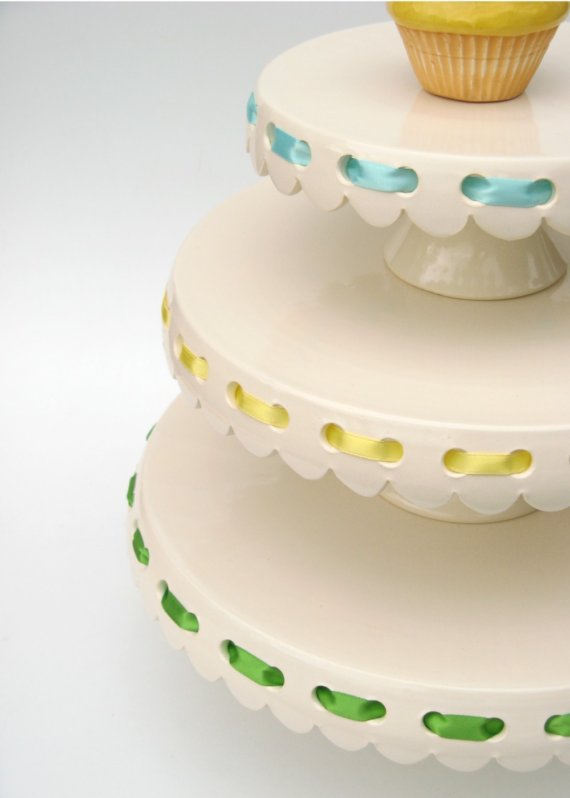
The colors are reminiscent of pastel icing and the eyelet lace edging of frilly lace, as displayed in this set of three cake stands (shown left). Custom colors are available on special request.

Or, you could opt for a more traditional white or off-white cake stand and thread a colored ribbon through it to match your theme or occassion.

Black and orange for Halloween cupcakes, bright red to highlight a prized Christmas fruitcake. Pale blue or soft pink to celebrate a new baby. Or choose the colors for your wedding and display tempting treats at your bridal shower. Again, you are able to request different colors of ribbon other than the aqua, yellow and green as shown in this set of three eyelet cake plates (shown right).

Based in Atlanta, GA; creator Jeanette Zeis has worked with clay for over 15 years and has operated a pottery wheel full time since 2007.

Her online store offers a wide variety of pottery dishware for the home including bowls, plates, cups and planters. You can learn more about her work at Jeanette Zeis Ceramics.

In the meantime, help yourself to another serving of delicious cake plateware.

Perfect Petite Pincushions


I’m sure this has happened to many a sewing phenom who’s had one of those magnetic pin holder contraptions. You know, the yellow oval thing that looks like it could double as a soap dish. Nice for keeping the pins in place . . .not so nice when it drops on the floor late at night and all the pins go scattering across the floor along with the cat who was dozing so nicely under the sewing table. So I have reverted back to a traditional stuffed fabric pincushion.


The uber-common design of a tomato with a funny little strawberry attached was most likely introduced during the Victorian Era. But really . . . a tomato and a strawberry? I mean, the strawberry is kinda cute but the tomato just makes me think of pasta which makes me hungry. According to Tomatoes Are Evil.com, pins were initially stuck in ripe tomatoes all over Europe. The firmness of the skin with the softness of the inner pulp was ideal for keeping the pins in place. When no ripe tomatoes were abound, housewives and seamstresses made red, tomato-looking cushions for their pins. And since tomatoes and strawberries grow well together . . . voila!

Pincushions are typically filled tightly with stuffing so that the pins are held rigidly in place once poked into the fabric. Traditionally, wool roving (un–spun wool) is used in the tomato in order to prevent rust on the pins. The attached strawberry is typically filled with an abrasive such as emery in order to keep the pins clean and sharp.

So in not wanting to stay with the traditional, in my search I came across a couple different takes on the tomatoes-love-strawberries theme. And I must say, these would make pretty additions to any home, sewing phenom or not. I like the idea of the little strawberries in reds, greens and whites by allthingssmall to decorate a holiday tree. Or a trio of little pumpkins by Sea Pinks for a centerpiece at Thanksgiving. And I adore the sunny yellow flowers on denim blue felt by The Daily Pinchusion, while the yummy cupcake design by Smarmy Pants reminds me to smile and find the whimsy when my sewing isn't quite going as planned.

Sharp, clean pins with no rust that don’t fall all over the floor held by beautiful and charming designs . . .? Genius!

get crackin' . . .

Aren't these eggs gorgeous? I adore the beautiful color arangement and contrast, almost too pretty to break open . . .almost.

There are so many things I want to make this weekend. Top of my list is cookies. Rich, dark chocolate cookies that hide chunks of ooey-gooey chocolate that melt in your mouth. I have a couple new recipes I've been looking at, so I think I'll try one or two of them out. Then I'll take them to work and test drive them on my co-workers to see which they prefer.

My nephew is a big fan of cupcakes. I've been toying with the idea of taking our family's Chocolate Buttermilk Sheetcake recipe which makes a lusciously moist and fluffy cake, and using it to make cupcakes instead. The recipe uses dark Dutch process cocoa instead of baking chocolate and I usually bake it in a 13x9 inch baking dish. When it's done baking, I cover the top with mini marshmallows and place it under the broiler for a couple minutes just to a toasted gloden color, then remove the pan and drizzle with melted chocolate. Talk about sin city . . indeed!

Also in consideration for this weekend is a cheesecake. I have three packages of cream cheese in the fridge that are calling out . .."cheesecake . .we want to be a Cheeeeeesecaaaake !" And with all the fresh berries in season, this is a great time to make one.

So it looks like a happy weekend of baking is ahead.